Q. I’m setting up a new grow room, and have no idea where to start. I’m overwhelmed with lighting choices, grow tents, and ventilation. Will you please give me some pointers as to how to get started?
A. Setting up a new grow room can be challenging, especially for the new grower. There are many different ways to do it. We could write a book on all the options, but for now, we will look at one option. Our goal with this set up, will be:
1. Harvest a pound every month. (this is referred to as a perpetual grow)
2. Stay under a 6 plant count.
3. Odor controlled environment. No odor should be detected in the house or outdoors.
4. Stay under a budget of $2500.
If your dreams are bigger or smaller than this example, don’t worry. Most of the advice I give below is applicable to ANY size grow room.
_____________________________________________________
1. Build rooms? Or Buy tents? Budget: $500
Your first decision will be to decide if you want to build a room, or use a tent. We will need one area for vegetative growth, and another area for flowering.
If you live in an apartment or rent a house, you won’t have the luxury of building a room, so you’ll have to go with tents. A tent can be set up and disassembled in minutes. It costs ABOUT the same price to build rooms, or buy tents.
Captain’s WARNING! Your flower room MUST exhaust to the outside. To think that you will flower in your dwelling, and NOT stink up the place, is denial. Place your tents, or build your room in an area where you can exhaust smelly, humid air to the outdoors.

Two future chongers grow under 18/6 light in a 4 x 4 tent, preparing for flower.
Sizing: to grow a pound a month, you’ll need a 4 x 8 area for flower, and a 4 x 4 area for vegetative growth (roughly 48 square ft total). We will set aside $500 for room building costs, or two tents. That will afford you good quality tents, or plenty of money for building your own rooms (2×2’s, plywood, screws etc). I won’t get into how to build a room, but after reading this entire article, you will have a good idea of what you’ll need to do.

The light proof door way of a flower room.
_____________________________________________________
2. Room ventilation and odor control. Budget $800
We will assume we have enough cool air outside the grow room, in order to cool it, without additional air conditioning. If your room is in a basement, that is ideal!
Q. What about co2?
A. To set up co2 injection correctly, it is very costly. You’ll need a co2 burner ($400), a controller, ($1000), and air conditioner and dehumidifier (to run a sealed room), and space in your room to run these things. The list goes on. Introducing co2 also adds margin for error. If your co2 malfunctions, your plants will starve of co2. If your air conditioner or dehumidifier goes out, your room temperature could rise and kill everything. Some new growers often want “the best” and are willing to throw down massive amounts of cash to get it. Remember… it’s 10% equipment, 90% grower. Expensive gadgets, like fancy room controllers and co2 injection, are sometimes more trouble than they are worth. And if it means anything to you, none of the plants you see in the pictures here, are grown with co2.
So let’s keep it simple, and take a look at how we will ventilate our room.

Can fan’s “MaxFan”. These fans are highest quality and have a built in speed control.
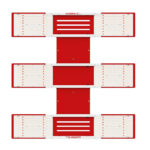
1. CanFan 1 cools the lights. The red and gray fan you see on the top right of the illustration below, does nothing but cool the lights. The intake can be positioned so it takes in clean air from anywhere in your house, or from the outside (filter needed) and the exhaust can be sent outside (in the summer), or inside (in the winter, to help heat your house). It is important to cool your lights in this fashion, so the heat generated by the bulbs is not transmitted to the room.
Fans are slightly more efficient when we use them to PULL air, instead of PUSH air. But as Scotty and dude talk about on episode 43, it is better to PUSH air in this configuration. I’ve made this mistake myself. If CanFan1 PULLED, smelly air might leak into hoods, or cracks in the duct work (blowing dankness into your living quarters or neighborhood).

An example of an ideal grow room set up.
2. Can fan 2 pulls air from veg to flower through a light proof vent. Remember, light doesn’t go around corners unless reflected, so if the inside of the vent is painted black, no light should leak through the vent.
3. Can fan 3 pulls out dank, humid air through a can filter (activated carbon filter scrubs of the air of smell) then pushes through a UV ozone filter (further decontaminates the air by killing spores). This air should then be exhausted to the outdoors. In the image above, you’ll see I’m exhausting up the chimney. It is good to get the exhaust as high as possible.
EDIT: Jason D pointed out to me that some people may have their furnace exhaust vented in their chimney as well. Take caution here, not to obstruct the furnace exhaust (or put back pressure on it) as CO could accumulate. Thanks Jason for the feedback!
In Episode 45, the Dude talks about the importance of scrubbing the air of smell. If you’ve read this far, you’re probably a stoner. YOU won’t be able to smell it as much as the old bat next door. Don’t draw attention to yourself. 45% of people frown upon weed. A UV filter will further help with odor control, and in my opinion, is absolutely necessary. As air is passed over the lights, the ozone generated from the light, mixes with the air and kills any live smelly spores.
Captain’s tip! Air must be PUSHED through an ozone filter. If pulled, the dank air doesn’t mix with the ozone properly, and the ozone will not do it’s job efficiently. It DOES make a huge difference.
Don’t look directly at the light!

The UV-80H light generated ozone from uvonaire.
4. Intake vents. When you exhaust air from your room, the make up air must come from somewhere. It will find it’s way in through cracks in the tent, or leaks in your room. If you purposely make an intake vent in the veg room, air will flow in there, go through the light poof vent, and go into flower. You will need to tweak this, in order to get the best air flow.
5. In addition to the can fans, you will also need a small room fan for both flower and veg. This gives your plants air flow which is absolutely necessary to bring fresh co2 to the surface of the leaves.
_____________________________________________________
3. Lighting. Budget $1000
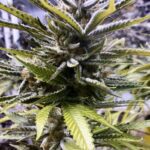
Big light = big harvest, period. There is no “magic” light that works better than high intensity, high pressure sodium or metal halide light. HID is cheap, it’s intense, and it grows fat colas like this:

16″ Tall cola, grown under 600W HPS light.
Captain’s warning: Some LED light manufacturers promise bigger harvests with less electricity. I have yet to see a lower wattage light (LED, or other) produce the same as HID light. It costs (depending on your location) $35/mo to run a 600W HID light, 12 hours a day. Most LED fixtures are packed with computer fans that pull the heat off the circuit board and blow warm air into your room, which is impossible to duct out.
If you want plentiful harvests, I suggest 600W Metal Halide light for vegetative growth and 600W high pressure sodium for flower. 600W properly covers a 4′ x 4′ area. 1000W will produce about 25% – 30% more product in the same area, and would allow you to extend the area to 5′ x 5′. The choice is yours.

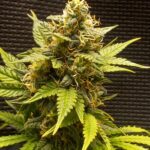
GDP Blue Dream, 6 weeks into flower under 600W HPS.
For each light, you will need a ballast, a bulb, and a hood (fitted with ducts), so we can duct the heat out of the room.
Ballasts: just about any digital ballast will do. These range from $100-$300 each.
Bulbs: If you’re on a budget, I suggest the Apollo 600W bulbs, which can be had for about $25 each, and replace them every 4 months. For a better yield, use the 600W hotrilux eye bulbs, at about $80 each.
Hood: There are a plethora of hoods to choose from. If you’re on a budget or in a tent, I recommend a “Cool tube”. These are the simplest of hoods and are nice and light weight (for tents). The large single cola you see, two pictures up, is being grown under a cool tube. Although some light is wasted, they throw a very nice foot print, and leave room on the ceiling to hang your carbon filter and other equipment.

A 23″ cool tube can be had for under $50.
Each 600W light should cover a 4 x 4 area. We will grow a single plant in each area in flower, which will produce a pound of dried bud when finished. In vegetative growth, we can grow 2-3 plants, getting them as big as possible, before putting them in the flower room. Again, in the diagram you can see how we configure the lights in our rooms. NOTE: You will need to loop some duct slightly to prevent light will bleeding over during from veg to flower during the flower dark period.
Capn’s tip: As a general guideline, using 40W of light per square ft will give you the potential to produce about 1oz of finished bud, per sq ft. A 4 x 4 area is 16sq feet, and under 600W (37.5 watts / sq ft), and experienced grower can get 16 ounces. An expert grower, with a good strain, can get over 20 in the same space (about 1 gram per watt) but this is exceptional and may require over 2 months veg time.
An example of an ideal grow room set up.
Using this system, no air conditioning or de-humidification system is needed. Since we are constantly pulling warm, humid air out of our rooms, that air is replaced with cool air (with fresh co2) from our dwelling. I agree, it is slightly inefficient on your home air conditioner, however I have found it is still cheaper than running a dedicated air conditioner.
__________________________________________________________
That’s it! We spent $2300. That leaves us $200 for our grow method and nutrients.
Room or tents: $500
Ventilation and odor control: $800Lighting: $1000
Q. How is it possible to grow a pound every month with only 6 plants?
A. I won’t go into growing methods and the details of perpetual grows in this article. But, in this set up, we won’t keep a mother plant, and we won’t go over a count of 5 plants. Every month, we put one plant into flower (and harvest a plant), and we take a clone from that same plant, two weeks before it goes to flower (for 2 weeks we will have 5 total plants). That clone grows for 2 months, while the mother flowers, then IT goes into flower. Alternating this method with each station would allow you to grow two different strains. I’ve been taking clone, from clone, from clone, for almost 3 years and still have not yet noticed any degradation in vigor.
I know make it sound easy. There’s obviously more to growing than equipment. It takes some practice, and you will make many mistakes along the way. A new grower should be able to start with this set up and, get 7-10oz per. After several months, even a stoner should be able to consistently break the one pound mark. Scotty goes even bigger, breaking 1.5lbs each. Set up your room, keep listening to the “dudegrows” show, and it won’t be long before you’ve got more bud than you can possibly smoke. In that case, call Scotty. He likes to smoke “about a pound a day”.
__________________________________________________________
Grow big or go home.

Purple Dream in vegetative growth.
In the next article, we will cover perpetual grows; why they are so efficient, and how a perpetual grow can catapult you from stoner, to expert grower, in a very short time.


Another Great article Capn. It is interesting that you consider the UV filter to be “absolutely necessary”. I have not seen them used that much, or heard them talked about that much on the show. I would advise a noob against “exhaust(ing) to chimney”, like the diagram suggest. The “chimney” is most often the furnace exhaust, and should be kept exclusively exhausting poisonous CO from the furnace. At the least you need a properly placed back draft damper, and a good CO monitor/alarm. Better to go dryer vent style just above the foundation, IMHO. I wonder what Todd at Temp. needs thinks about that common exhausting practice?
High There Cap!!
Just wanted to say I agree with you about growing with LEDs, I think they belong on XMas trees and flashlights maybe even on 4WD vehicles but not in the bloom room, at least not yet!
simple and to the point!! my set up is very close to this and very effecient…i reccomend the exhausting lights as well…too much info made me take my can fans off and it then required ac…but they will be set back up soon…i would only add to not be afraid to make adjustments while your in the process…the SHOCK word scares many but getting it right and effeceint is worth trying different things til your enviroment is sustainable and not bouncing all over…like the uv light tip!! and extra scrub! NO BETTER PLACE TO GET TOP, NOTCH NO BULL OR ENDORSED INFO FOR ALL GROWERS!! THANK YOU DUDE GROWS SHOW AND ALL THE GOWERS WHO PARTICIPATE….THUMBS UP CAP’N!!
Hey Capn, great write up. I especially like the way you maximize the feng shui of everything by utilizing the light/heat for your home in the winter and also using house air as your inlet. Now all that exhaling of CO2 won’t be wasted. Might behoove you to put a dog bed right in front of the vent so he can produce some CO2 for your garden to scrub.
As far as exhausting to the chimney, I agree that this would be the best location of a house/home to vent scrubbed air to, especially if using an Ozone genny, however, if the grower has little experience with masonary or general carpentry, this might not be a good place to dump. If however, the grower does have masonary/carpentry skills (either or), I too would advise a chimney as there are other odors being produced by the water heater and furnace to further mask what’s going on, and at the end of the day, our privacy is paramount.
Note about venting to chimney, I suggest keeping at least a small inline ($30) fan running at slow to medium speeds. This wouldn’t produce noise, nor consume that much extra amps, but it would keep positive pressure at the point of entry so no CO2 back fills into the grow area, at least not enough to harm any humans that also use the same space. On another note, I am wanting to investigate tapping my chimney to possibly use the CO2 that my gas burning appliances produce. Much more research is needed, but I think it can be done and yes I have both masonary and carpentry skills so please don’t worry that I will harm myself or others in the process.
Skyler, I could use your help. Thanks for your comments. My dog is breathing heavy right now. A co2 meter is on my christmas list.
>>>Jason Dewey Said: Another Great article Capn. It is interesting that you consider the UV filter to be “absolutely necessary”.
“in my opinion”, it is necessary for odor control. I know many people don’t use them, but I have found, even with a NEW 12×36 carbon filter, sometimes I can still catch a whiff, depending on the wind, and the strain I’m growing. After installing the UV-80H, the smell is gone.
>>>I would advise a noob against “exhaust(ing) to chimney”, like the diagram suggest. The “chimney” is most often the furnace exhaust, and should be kept exclusively exhausting poisonous CO from the furnace.
Absolutely a great point. In fact, I’ve edited my article slightly to use caution here. Thanks for your feedback, Jason. Much appreciated.
>>>blaze said: getting it right and effeceint is worth trying different things til your enviroment is sustainable and not bouncing all over
Great comment, and agree 100%. There are always ways to improve. I can’t tell you how many times I’ve changed my ventilation set up around. Thanks again for your compliments to The Captain and the dude grows show.
Hi webmaster do you need unlimited content for your website
? What if you could copy content from other sites, make it unique and publish on your blog
– i know the right tool for you, just search in google:
Ziakdra’s article tool
One question. If you’re pulling air out don’t you have to replace that air? In your diagram you have air coming in through the lights but not the room. Is that enough?
For veg stick to T5’s, and tossing in a few leds for flower will produce much better plants. I’m sorry that you can’t yet see the value of the new leds but side by side they do just as good. This is a year old so perhaps you can see the value of leds now or perhaps you still drive a 1970 v8 gas chugging beast thinking that you can beat a 2015 v6 that is far more efficient.
Can a Grow Bright filter and fan assembly be mounted along a wall, with the big can filter resting on the floor? I ask, only because I’m challenged as far as getting the heavy equipment up on the ceiling, and maintaining it up there. I’m just using the filter/fan system to scrub the air in a small grow room.
Thanks
Maybe a dumb question but, how is it that the exhaust pulled through/over the lights doesn’t carry with it, the suspect scent?
Dave because you are running sealed hoods with a sealed line running to them or have a carbon filter/ ozone Gen running on the air coming out of the room.
The drawings here give a pretty good break down.
>>>If you’re pulling air out don’t you have to replace that air?
The low pressure in the room, automatically sucks in air. No need for a input fan.
>>>For veg stick to T5’s, and tossing in a few leds for flower will produce much better plants.
No it wont. If it did, I would be doing it. I promise.
>>>Can a Grow Bright filter and fan assembly be mounted along a wall, with the big can filter resting on the floor?
Yes absolutely you can set your carbon filter on the floor.
>>>how is it that the exhaust pulled through/over the lights doesn’t carry with it, the suspect scent?
The intake to the light run, pulls from the house, and exhausts to the house. Since there is no breaks in the run, that air stays stink free. If you have leaks in the hose, then yes you will stink up your house. You can PUSH the air thru the light hoods if you want to eliminate the chance of leaks.
Thanks hank! Just saw your post!
I don’t see where air enters the room in the diagram.
Thanks again CAPN
It’s 2016 now and LEDs have made a huge progress, even in the past 2 years since this article is written. You just have to buy quality LED fixtures from companies who know what they are doing. Platinum LED lights are amazing and I’ve had awesome results. The dankest buds you’ve even seen. No more heat issues, no more wasted watts on heat, and perfect light spectrums and PAR readings.
These fixtures put out very, very little heat. Not sure what LEDs you were talking about, but check out some of the newer, USA made ones. NOT China made.
What companies do you suggest for LED’s
In your diagram, how is fresh air coming into your veg area? I understand negative pressure, but where does the negative pressure bring the fresh air from?
Might be a stupid question but how does light not go into the flower room if you are cooling all lights with the same fan?